November 27, 2025
Make Your Own Holiday Window Clings
If you want a festive project that is inexpensive, fun, and easy to customize, holiday window clings are perfect. I love this DIY because it adds instant charm to any window, mirror, or glass door, and you get to make designs that fit your exact holiday vibe. Whether you want classic snowflakes, cute gingerbread men, bold Christmas phrases, or colorful ornaments, you can make them all with a few simple supplies and a little creativity.
To get started, gather your basics. You will need white glue or clear glue, food coloring or acrylic paint, a handful of plastic sheet protectors or a piece of wax paper, and a set of paintbrushes or squeeze bottles. If you want to outline your designs, black puffy paint works great. You can sketch your designs on plain paper first, then slip the paper under your plastic sheet so you have a guide to trace. This keeps everything neat and helps your shapes come out clean and symmetrical.

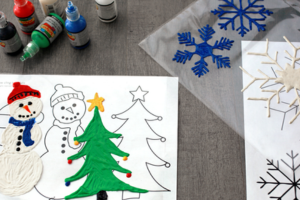
Begin by outlining your design with the puffy paint. This step matters because it creates borders that hold the glue mixture in place. Let the outlines dry for about an hour so they do not smear when you add color. Once the outlines are firm, mix your glue with a few drops of food coloring or acrylic paint. You want a smooth, slightly thick consistency that spreads easily but does not run. If you prefer a transparent stained glass look, add less color. If you want bold, opaque clings, use a little more.
Next, fill in each space with your colored glue mixture. Take your time and work in small sections. The key is to spread the mixture evenly so it dries without thin spots. If you see bubbles forming, gently pop them with a toothpick. Once everything is filled in, let your designs dry completely. This usually takes about twenty four hours. You will know they are ready when the edges lift easily and the cling feels flexible but not sticky.
Carefully peel your window cling off the plastic sheet. It should come off in one smooth piece. If any edges stick, gently loosen them with your fingernail. Once you have your finished cling, place it on a clean window or mirror. A quick wipe with a damp cloth helps the cling adhere better. Press from the center outward to smooth out any bubbles. Step back and enjoy your holiday masterpiece.
The best part is how customizable this project is. You can create themed sets for the entire season, make personalized clings with names, or even involve kids in decorating their own shapes. Store them flat between sheets of wax paper when the season ends so you can use them again next year.
This simple DIY adds color, personality, and joy to your home. It is creative, budget friendly, and relaxing. Once you make your first set, you will want to decorate every window in the house.